Vous avez des problèmes avec un support de papier toilette obsolète ou bancal? Vous n'êtes pas seul. De nombreux amateurs de bricolage sont confrontés au même défi lors de la rénovation de salles de bains ou de simplement vouloir mettre à niveau les luminaires. La bonne nouvelle? Supprimer un distributeur de papier hygiénique est souvent plus simple qu'il n'y paraît - si vous connaissez les bonnes techniques.
Ce guide vous guidera à travers le processus étape par étape pour éliminer différents types de détenteurs en toute sécurité, que vous ayez affaire à des modèles traditionnels, encastrés ou en céramique. Nous couvrirons les outils essentiels, le dépannage des vis dépouillées et la protection de vos murs contre les dommages - vous pouvez donc aborder ce projet en toute confiance et éviter les pièges courants.
Identification de votre type de support de papier toilette
Connaître votre distributeur de papier hygiénique Le type est la première étape vers un processus de suppression sans tracas, que vous soyez mis à niveau ou que vous fassiez simplement un entretien de salle de bain.
Quand il s'agit de papier toilette suppression du support, la première chose que vous devez faire est d'identifier le type de titulaire avec lequel vous avez affaire. Différents porteurs ont des mécanismes différents, et l'utilisation de la mauvaise approche peut entraîner des dommages ou une frustration. Décomposons les types les plus courants et comment les reconnaître.
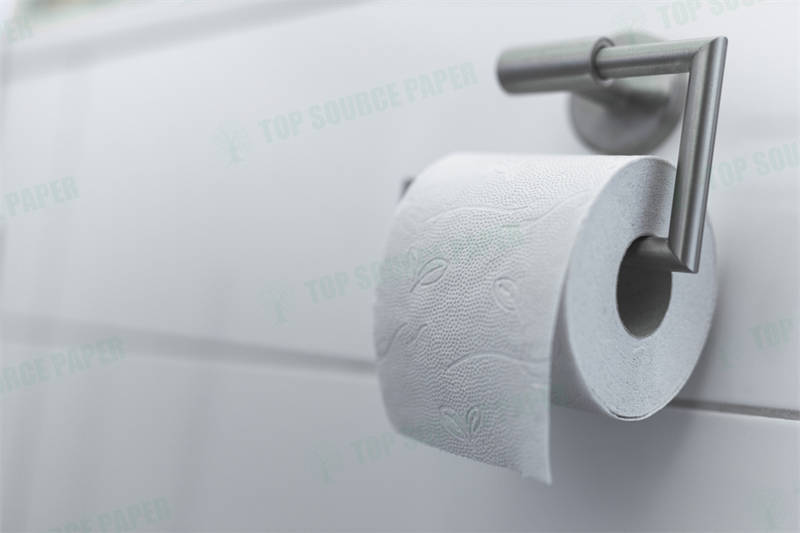
Bollants traditionnels à printemps: identification des fonctionnalités et des problèmes communs
Ce sont les plus courants Types de porte-toilettes. Ils ont un ressort à l'intérieur de la tige qui maintient les tensions sur le rouleau. Vous verrez généralement un petit bouton ou une indentation près d'une extrémité. En appuyant sur cela libère la tension, permettant à la tige de sortir. Les problèmes courants incluent des ressorts rouillés ou des tiges coincées - parfois un peu WD-40 fait l'affaire.
Pivotage des porte-bras: comment ils diffèrent et des défis de retrait spécifiques
Les porte-bras pivotants ont un mécanisme de charnière qui permet au support de s'ouvrir. Recherchez une petite vis ou un verrou près de la charnière. Ceux-ci peuvent être difficiles car les vis sont souvent cachées ou peintes. Un gourmandise avec un tournevis à tête plate pourrait être nécessaire pour y accéder.
Bollants encastrés: reconnaître les attaches cachées et les méthodes de montage
Les supports encastrés sont construits dans le mur, donnant un look élégant mais faisant Retirez un support de papier toilette Un peu plus impliqué. Ils ont généralement des vis cachées derrière la plaque frontale. Vous devrez peut-être sortir doucement du couvercle avec un couteau ou un tournevis pour les trouver.
Poldants en céramique: considérations spéciales pour éviter de se fissurer ou de se déchiqueter
Les détenteurs de céramique sont élégants mais fragiles. Si vous êtes Retirer un support de papier toilette en céramique sans dommage, évitez d'utiliser des outils métalliques directement sur la céramique. Enveloppez un chiffon autour du support avant d'appliquer une pression et travaillez lentement pour éviter les fissures.
Types de support de papier toilette et conseils de retrait
| Type de support | Caractéristiques clés | Méthode de suppression | Problèmes communs | Recommandations d'outils |
|---|---|---|---|---|
| À printemps | Bouton ou indentation à une extrémité | Appuyez sur le bouton, glissez la tige | Ressorts rouillés, tige coincée | WD-40, maillet en caoutchouc |
| Bras pivotant | Mécanisme de charnière, vis souvent cachés | Dévisser la charnière, le bras de levage | Vis peintes | Tournevis à tête plate, ruban de peintre |
| Encastré | Flush avec mur, plaque de face cachée | Retirer le couvercle, dévisser | Plaque frappée | Outil de carrosserie en plastique, couteau utilitaire |
| Céramique | Matériau décoratif et fragile | Douce indulgente, protection en tissu | Cracking, écaillage | Tissu doux, grattoir en plastique |
| Magnétique | Pas de vis visibles, surface lisse | Se tordre et tirer | Résidu adhésif fort | Gun-Gun (réglage bas), goo disparu |
Une fois que vous avez identifié votre type de titulaire et que vous l'avez supprimé avec succès, vous pourriez envisager de passer à une option plus moderne ou écologique. De nombreux modèles plus récents sont conçus pour une installation et une suppression plus faciles, vous économisant “une tonne de tracas” en bas de la route.
N'oubliez pas, si vous n'êtes pas sûr de Comment identifier mon type de support de papier toilette, examinez de près comment il est monté et s'il a des vis visibles ou des mécanismes de libération. En cas de doute, allez lentement et doux - comptabilisez-vous pour prendre une minute supplémentaire que d'endommager votre mur ou votre support.
Rassembler les outils et les matériaux essentiels pour le retrait sûr
Avoir les bons outils avant de commencer votre papier toilette Le projet de suppression du support peut gagner du temps, éviter les dommages et rendre l'ensemble du processus plus fluide.
Avant Retirer le support de papier toilette Les luminaires, il est crucial de rassembler tout l'équipement nécessaire. Être préparé avec propre Outils pour le support du support de papier toilette Aidera à éviter les voyages à mi-projets à la quincaillerie et à protéger vos murs des dommages inutiles.
Ensembles de tournevis: Choisir la bonne taille et le bon type (Phillips, Flathead, Allen)
Le Meilleur tournevis pour retirer papier toilette Vis du support dépend de votre match. La plupart des supports utilisent des phillips ou des vis à tête plate, tandis que certaines conceptions modernes nécessitent des clés Allen. Un tournevis multi-bit avec des pointes magnétiques fonctionne mieux pour empêcher les petites vis de se perdre pendant le retrait.
Fouilles et couteaux de mastic: comment les utiliser pour protéger les murs
Les pinces à nez aiguille aident à éliminer les vis tenaces, tandis qu'un couteau de mastic sert à plusieurs fins. Apprentissage Comment utiliser un couteau de mastic pour enlever un support de papier toilette peut empêcher les dommages causés par le mur – Faites glisser derrière le luminaire pour briser les joints de peinture avant de dévisser.
Extracteurs à vis: quand et comment les utiliser pour les vis dépouillées
Pour les vis dépouillées qui ne bougeront pas, un ensemble d'extracteur à vis peut être une bouée de sauvetage. Ces bits inversés saisissent les têtes de vis endommagées lorsque les méthodes standard échouent, vous évitant d'avoir à forer tout le luminaire.
Équipement de sécurité: l'importance des gants et de la protection des yeux
Ne négligez pas la sécurité lorsque vous faites Outils de réparation de salle de bain bricolage travail. Les gants protègent contre les arêtes vives, tandis que les verres de sécurité empêchent la poussière ou les débris de tomber dans vos yeux pendant le retrait.
Boîte à outils de suppression du support de papier toilette essentiel
| Outil | But | Caractéristiques spéciales | Options alternatives | Notes de sécurité |
|---|---|---|---|---|
| Tournevis multi-bit | Supprime divers types de vis | La pointe magnétique empêche les vis perdues | Tournevis individuels | Surveiller le glissement |
| Pince à nez d'aiguille | Grips Spupped Vis | Longue portée des espaces restreints | Pinces à la poignée vide | Porter des gants |
| Couteau de mastic | Protège la surface du mur | Fine lame glisse derrière le luminaire | Couteau spascule en plastique | Aller lentement |
| Ensemble d'extracteur à vis | Supprime les vis endommagées | Conception de coups à l'envers | Méthode de la bande de caoutchouc | Nécessite un alignement minutieux |
| Lunettes de sécurité | Protection des yeux | Lentilles anti-buts claires | Lunettes régulières | Essentiel pour le travail des frais généraux |
Avec ces outils rassemblés à l'avance, vous serez prêt à vous attaquer efficacement à n'importe quel travail de suppression de porte-toilettes. N'oubliez pas que l'investissement dans des outils de qualité est payant – Ils dureront de futurs projets et faciliteront le travail. Pour ceux qui envisagent une mise à niveau après le retrait, de nombreux porteurs modernes comportent des systèmes d'installation sans outils qui éliminent ces tracas pour la prochaine fois.
How to Remove a Toilet Paper Holder: Step-by-Step
“La suppression d'un support de papier toilette nécessite correctement la patience et la bonne technique pour éviter les dommages causés par le mur et assurer un processus de retrait propre.”
Apprentissage Comment retirer un support de papier toilette Correctement peut vous sauver des réparations murales inutiles et de la frustration. Que vous rénovez ou remplacez, ceux-ci étapes de suppression du support de papier toilette vous guidera tout au long du processus en toute sécurité.
Étape 1: Localisation et relâchement des vis ou attaches de réglage
La plupart des supports ont des vis visibles sur les extrémités ou sous des capuchons décoratifs. Utilisez le tournevis approprié pour les desserrer. Pour les vis cachées, ressentez doucement autour des bords du support ou recherchez de petits trous d'accès.
Étape 2: Prenant doucement le support du mur
Une fois les vis retirés, faites glisser un couteau de mastic derrière le luminaire pour briser tout joint de peinture ou de calfeutrage. Travaillez lentement sur tous les côtés supprimer un support de papier toilette en toute sécurité sans endommager la surface du mur.
Étape 3: Adresse des vis cachées et des ancres murales
Si le support ne bouge pas, vérifiez des attaches supplémentaires. Certains modèles ont des ancres cachées qui nécessitent une extraction minutieuse. Pour les ancres tenaces, utilisez des pinces à nez d'aiguille pour les détendre.
Étape 4: nettoyer la zone et préparer les réparations
Après le retrait, nettoyez tous les résidus adhésifs et remplissez les trous de vis avec de la spackle. Ce Guide étape par étape pour retirer un support de papier toilette du mur S'assure que les murs de votre salle de bain restent en parfait état pour tout ce qui vient.
Liste de contrôle de suppression du support de papier toilette
| Étape | Outils nécessaires | Estimation du temps | Niveau de difficulté | Défis potentiels |
|---|---|---|---|---|
| Localiser les vis | Lampe de poche, tournevis | 2-5 minutes | Facile | Vis cachées ou peintes |
| Desserrer les attaches | Jeu de tournevis | 3-7 minutes | Moyen | Têtes de vis dépouillées |
| Titulaire | Couteau de mastic, pinces | 5-10 minutes | Moyen | Liaisons adhésives fortes |
| Retirer les ancres | Pince à nez d'aiguille | 2-8 minutes | Dur | Ancres cassées dans le mur |
| Zone propre | Spackle, papier de verre | 5-15 minutes | Facile | Grands trous ou dégâts |
Rappelez-vous que Comment supprimer un papier toilette Porte-toile sans causer de dommages Cela dépend en grande partie de prendre votre temps et d'utiliser les bons outils. Une fois supprimé, envisagez de passer à un modèle plus moderne ou respectueux de l'environnement qui pourrait offrir une installation et une suppression plus faciles à l'avenir.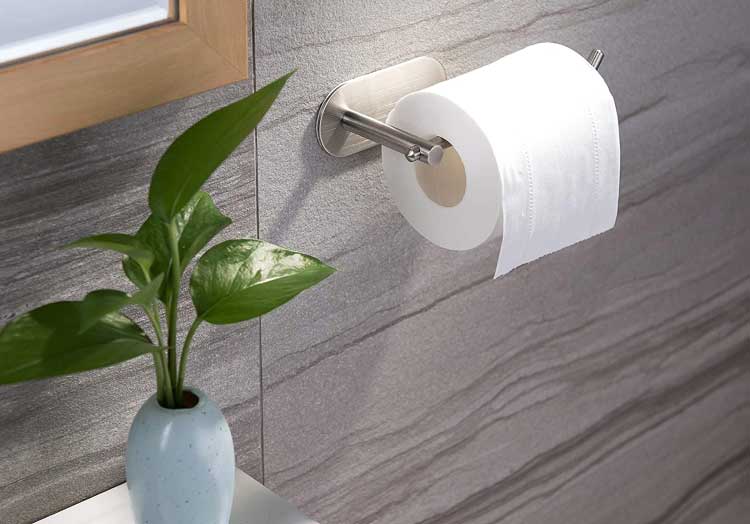
Dépannage des problèmes communs: vis dépouillés, rouille et ancres tenaces
“Même l'élimination du support de papier de toilette le plus simple peut frapper les accrocs – Ces techniques éprouvées vous aideront à surmonter les obstacles courants sans endommager vos murs.”
Quand enlèvement papier toilette titulaire Les luminaires, vous pourriez rencontrer des problèmes obstinés qui nécessitent des techniques spéciales. Savoir comment gérer ces problèmes peut faire la différence entre un retrait en douceur et une expérience frustrante.
Traitement avec des vis de réglage dépouillées: Techniques d'extracteur en caoutchouc et à vis
Pour Comment supprimer un papier toilette Vis de réglage du support qui est dépouilléPlacez une élastique épaisse sur la tête de vis avant d'appliquer votre tournevis. Le caoutchouc comble les lacunes, offrant une poignée. Pour les vis gravement dépouillées, utilisez un bit d'extracteur à vis qui mord dans le métal lorsque vous tournez dans le sens antihoraire.
Élimination des vis rouillées: Pénétration de l'huile et de l'application de chaleur
Le meilleur façon de retirer un papier toilette rouillé titulaire du mur implique la patience et les bons produits. Appliquez de l'huile pénétrante (comme WD-40) et laissez-la tremper pendant 15 minutes. Pour les caisses obstinées, chauffez soigneusement la vis avec un sèche-cheveux pour agrandir le métal avant de tenter de retirer.
Extraction des ancres murales tenaces: utilisant des pinces et un effet de levier
Lorsque les ancres ne bougeont pas, saisissez-les fermement avec des pinces au nez d'aiguille et se tordre tout en tirant doucement. S'ils cassent le rinçage avec le mur, utilisez un petit foret pour créer un trou pilote, puis insérez légèrement une vis pour retirer l'ancre.
Prévenir les problèmes futurs: conseils pour protéger les nouvelles installations
Envisagez d'utiliser des vis en acier inoxydable pour de nouvelles installations pour éviter la rouille. Appliquez une petite quantité de gelée de pétrole pour visser des filetages pour faciliter l'élimination future tout en empêchant la corrosion.
Problèmes et solutions d'élimination du support de papier toilette commun
| Problème | Outils nécessaires | Solution | Temps requis | Conseil de prévention |
|---|---|---|---|---|
| Vis déchiquetées | Élastique, extracteur à vis | Utilisez du caoutchouc pour la poignée ou l'extracteur bit | 5-15 minutes | Utiliser des tournevis de qualité |
| Attaches rouillées | Huile pénétrante, source de chaleur | Tremper d'huile, appliquer la chaleur | 20-30 minutes | Utiliser du matériel en acier inoxydable |
| Ancres coincées | Pinces, petit foret | Triller ou percer soigneusement | 10-20 minutes | Installer correctement les ancres |
| Vis peintes | Couteau utilitaire, tournevis | Score autour de la tête de vis | 5-10 minutes | Masque avant la peinture |
| Matériel cassé | Percer, pince | Forer des restes | 15-30 minutes | Ne forcez pas pendant l'installation |
Rappelez-vous que la plupart Vis déchiquetées papier toilette titulaire Les problèmes peuvent être résolus sans endommager vos murs. Pour particulièrement difficile Retirer un rouillé papier toilette titulaire Les situations, il est parfois préférable de travailler lentement sur plusieurs applications de pénétration de l'huile plutôt que de forcer le problème.
Réparation des dommages causés par le mur et considérant les remplacements écologiques
“Une bonne réparation du mur et des choix de remplacement durables peuvent transformer votre salle de bain tout en minimisant l'impact environnemental.”
Après Compléter votre papier toilette suppression du support, vous devrez probablement aborder tout Réparation du mur après le support du support de papier toilette. Ce Le guide couvre à la fois des techniques de réparation et durables Options de mise à niveau.
Trous et fissures de remplissage: en utilisant un composé spackle ou conjoint
Pour comment réparer les dommages causés par le mur après avoir retiré un support de papier toilette, commencez par nettoyer la zone. Appliquez de la spackle avec un couteau de mastic, des trous légèrement trop remplis pour tenir compte du retrait. Pour des dommages plus importants, utilisez le composé conjoint et le ruban de fibre de verre en fibre de verre.
Ponçage et peinture: réaliser une finition transparente
Une fois sec, poncez la zone réparée lisse avec du papier de verre à 120 grains. Essuyez la poussière, puis appliquez l'amorce avant de peindre. Faites correspondre votre peinture existante pour les meilleurs résultats – Apportez une puce à votre quincaillerie pour la correspondance des couleurs.
Poldants de papier toilette respectueux de l'environnement: Matériaux et avantages sociaux
Considérer porte-toilettes respectueuses de l'environnement Fabriqué en bambou, en métal recyclé ou en bois d'origine durable. Ces meilleur papier toilette écologique Options de support pour les salles de bains Offrez la durabilité tout en réduisant l'impact environnemental.
Tendances de conception modernes: options de mise à niveau de vos accessoires de salle de bain
Les conceptions contemporaines comprennent des porte-flotteurs minimalistes, des unités multifonctionnelles avec stockage et des modèles sans contact. Choisissez les finitions qui complètent le style de votre salle de bain tout en examinant les exigences de maintenance.
Comparaison du support de papier hygiénique respectueux de l'environnement
| Matériel | Durabilité | Entretien | Coût | Avantage environnemental |
|---|---|---|---|---|
| Bambou | Haut | Faible | $$ | À croissance rapide, renouvelable |
| Aluminium recyclé | Très haut | Aucun | $$$ | Réduit l'impact minière |
| Bois durable | Moyen | Huilage régulier | $$$ | Sources certifiées FSC |
| Plastique recyclé | Haut | Aucun | $ | Détourne les déchets des décharges |
| Céramique | Très haut | Aucun | $$ | Longue durée de vie, matériaux naturels |
Lors de la sélection de nouveaux luminaires, considérez à la fois l'esthétique et les fonctionnalités. Beaucoup de modernes porte-toilettes respectueuses de l'environnement Mélanger le design élégant avec des caractéristiques pratiques telles que le stockage de rouleaux de rechange intégré ou des mécanismes de changement facile.
Conclusion
Après des années dans l'industrie du papier ménage “cordur de tête” Si vous n'êtes pas préparé. Mais avec les bons outils et techniques, que vous ayez affaire à des vis tenaces, à des luminaires rouillés ou à des détenteurs de céramiques fragiles - c'est un projet de bricolage que tout le monde peut s'attaquer.
The key? Patience and the right approach. From identifying your holder type to repairing wall damage, each step matters. And if you’re upgrading, consider eco-friendly options—they’re not just better for the planet, but often easier to install and maintain long-term. Now that you’ve removed the old fixture, you might be planning a new setup for a commercial space. Choosing the right commercial toilet rolls and dispensers is key to efficiency and cost savings.
À la fin de la journée, un retrait en douceur signifie un problème de moins dans la mise à niveau de votre salle de bain. Maintenant que vous avez le savoir-faire, il est temps de saisir vos outils et de vous mettre au travail!
FAQ
Q1: Comment retirer un support de papier toilette du mur?
A1: Commencez par retirer le rouleau et la tige du papier toilette pour exposer les vis de montage. Utilisez le tournevis ou la clé Allen appropriée pour desserrer les vis, puis retirer doucement le support du mur.
Q2: De quels outils ai-je besoin pour retirer un support de papier toilette?
A2: En règle générale, vous aurez besoin d'un tournevis (Phillips ou à la tête plate) ou à une clé Allen. Dans certains cas, un foret électrique ou une pince peut être utile si les vis sont serrées ou dépouillées.
Q3: Comment puis-je retirer un support de papier toilette encastré sans endommager le mur?
A3: Pour les supports encastrés, localisez et retirez soigneusement les vis cachées. Soutenez le support lorsque vous le dévissez et utilisez des techniques de lutte douce pour éviter les dommages causés par le mur.
Q4: Que dois-je faire si la vis de réglage sur mon support de papier hygiénique est éliminée?
A4: Essayez de placer un élastique sur la vis dépouillée pour une adhérence supplémentaire tout en utilisant un tournevis. Alternativement, utilisez des pinces ou un outil d'extracteur à vis pour retirer la vis en toute sécurité.
Q5: Puis-je retirer un support de papier toilette sans utiliser d'outils?
A5: Certains modèles peuvent permettre le retrait à la main s'ils présentent une conception simple, mais la plupart sont fixés avec des vis qui nécessitent au moins un tournevis ou une clé Allen de base.
Q6: Pourquoi devrais-je retirer un support de papier toilette?
A6: Le retrait peut être nécessaire pour nettoyer derrière l'unité, le remplacer par un nouveau modèle, la réparation de la surface de montage ou la mise à jour de la décoration de votre salle de bain.
Q7: Comment puis-je assurer la sécurité lors du retrait d'un support de papier hygiénique?
A7: Assurez-vous d'utiliser les bons outils, de travailler lentement pour éviter d'endommager le mur et de porter des gants de protection. Vérifiez qu'il n'y a pas de risques électriques à proximité avant de commencer.
Q8: Y a-t-il un risque d'endommager le mur pendant le retrait?
A8: Oui, si le retrait est effectué avec force ou sans outils appropriés, il existe un risque d'endommager le mur. Suivez les instructions étape par étape et utilisez des techniques douces pour minimiser tout dommage.
Liens externes
- Département américain du logement et du développement urbain – Page d'accueil
- Commission du commerce fédéral – Informations sur les consommateurs
- Extension de l'Université du Minnesota
- Ohio State University Extension
- Commission de sécurité des produits de consommation aux États-Unis
- Association nationale des constructeurs de maisons
- Département américain de l'énergie - Économiseur d'énergie
- Harvard Business Review
